I purchased my house from someone who had flipped it. Some things were updated and new, which I appreciated, but there were also a number of things that felt unfinished or rushed. I was ok with this because it left room for me to add my touch to the home. All of the cabinets were new as well as the countertops and floors. However, the cabinets are a very dark brown – maybe an espresso. The countertops are a granite that is mixed with light tans and dark browns, and the tile floor is a light grey. None of these things go together in my head so I’ve struggled with what to do for a backsplash for over a year now.
I love a white subway tile with a dark grout but adding more grey/black to the kitchen seemed too dark and wouldn’t blend with the tones of tan I was already fighting over in my head. I started playing with the idea of a lighter tan grout color to tie in the cabinets and countertops. I was afraid the stark white subway tiles and white grout would contrast too much with my dark cabinets. I think the light tan grout is just the balancing act the kitchen needed. I decided to go with small sheets of white subway tile because I thought it would be easier to install them and keep the spacing consistent.
If this is your first attempt at tiling, I would recommend a simple shape and pattern. Complicated shapes/patterns = complicated cuts!
Materials


Subway Tile – Restore Bright White 3 in. x 6 in. Ceramic Modular Wall Tile (12.5 sq. ft. / Case) I used 2 cases at $15.00 each for a total of $30.00 spent on tile.
- This specific tile comes in many different sizes and colors and I thought it was easy to work with!
AcrylPro Professional Tile Adhesive for $11.84
- This is what you will spread on the wall and stick your tile to.
Polyblend #381 Bright White 10 lb. Non-Sanded Grout for $11.44
9 in. x 3/16 in. x 5/32 in. V-Notch Economy Flooring Trowel for $3.96
- This is what you’ll use to spread the tlle adhesive
4 in. x 9-1/2 in. Gum Rubber Grout Float with Traditional Wooden Handle and Non-Stick Gum Rubber for $10.97
7-1/2 in. x 5-1/2 in. x 1-7/8 in. Extra Large Grouting, Cleaning and Washing Sponge (3-Pack) for $4.98
- You’ll use these to wipe off the excess tile adhesive and grout from the face of your tiles
14 in. Ceramic and Porcelain Tile Cutter for $21.97
1/8 in. Original Job-Tough Tombstone-Style Tile Spacers (250 pack) for $3.18
- These are used to keep the spaces/grout lines between your tile consistent and even
TileLab 15 oz. Aerosol Grout Sealer for $14.28
- This cutter worked great for cutting the tiles vertically, but not so great cutting horizontally across the length of the tile. If you’re going to use larger tile – I would splurge for a better cutter or look into renting one for your project.
Caulk
Gloves
Total Cost on Materials = $101.18

Process
- Clear your countertops of everything and measure the wall space you will be covering with tile.
- Buy enough tile to cover the square footage needed plus 10% to ensure you have enough. Cuts can be tricky.
- Wipe down the wall surface to ensure it’s clean and the tile adhesive will stick well.
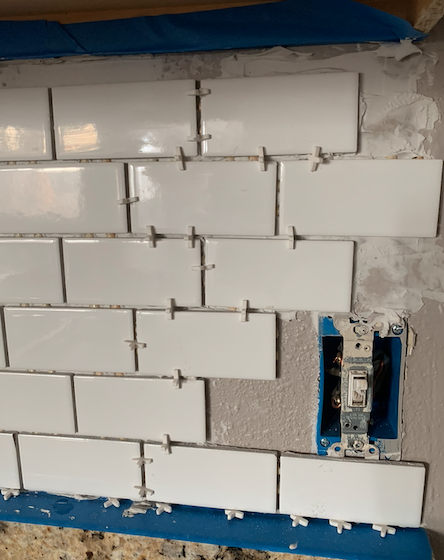
- Remove outlet covers and unscrew the screws a bit. You want to be able to pull the plate out so the covers sit on top of the tile and you don’t have a gap between the outlet face and the cover.
- Use your Trowel to spread the Tile Adhesive on the wall. I would start with 2 ft x 2 ft sections. Spread the adhesive and then add your tile to that space before it starts to dry. Keep the adhesive to a thing layer but be sure to cover the surface of the wall. You’ll want to spread it out relatively flat and then go back with the ridged side of the trowel to make ridge marks which allows for the tile to attach better.
- Press and hold the tile in place. Once you have it stuck, add your spacers to keep the space between tiles consistent and even.
- Continue this until you finish tiling your space. I would then go back and make your cuts needed to finish tiling spaces that aren’t perfect for your size tile.
- Wipe excess adhesive off the face of the tile with a damp sponge.
- Let the the tile adhesive dry for at least 24 hours.
- Remove grout spacers
- Pour your 10lb bag of grout mix into a large bucket and the recommended 3 liters of water and mix for up to 5 minutes until you get a paste-like consistency.
- Wait 10 minutes.
- Re-mix grout.
- Use your Grout Float to grab some grout and brush it across the surface of your tile, ensuring a good amount goes into each space between the tiles.
- Wipe off the excess from the face of the tile with the edge of the grout float.
- Continue this until you have grout between all of your tiles.
- Wait 10-20 minutes for joints to firm up.
- Lightly wipe excess grout from face of tiles with damp sponge. Be careful not to use too much water here, just enough to remove excess grout.
- Wait 2 hours
- Clean your tiles with a cloth and admire your work! 🙂
- Wait 24-72 hours depending on your grout’s instructions to seal the grout.
- Seal the grout and let this dry for 24 hours before replacing outlet covers.


DIYMay 21, 2020


